Power Apps/ Automate – Add choice on SharePoint column field using Canvas App
24 steps
Overview
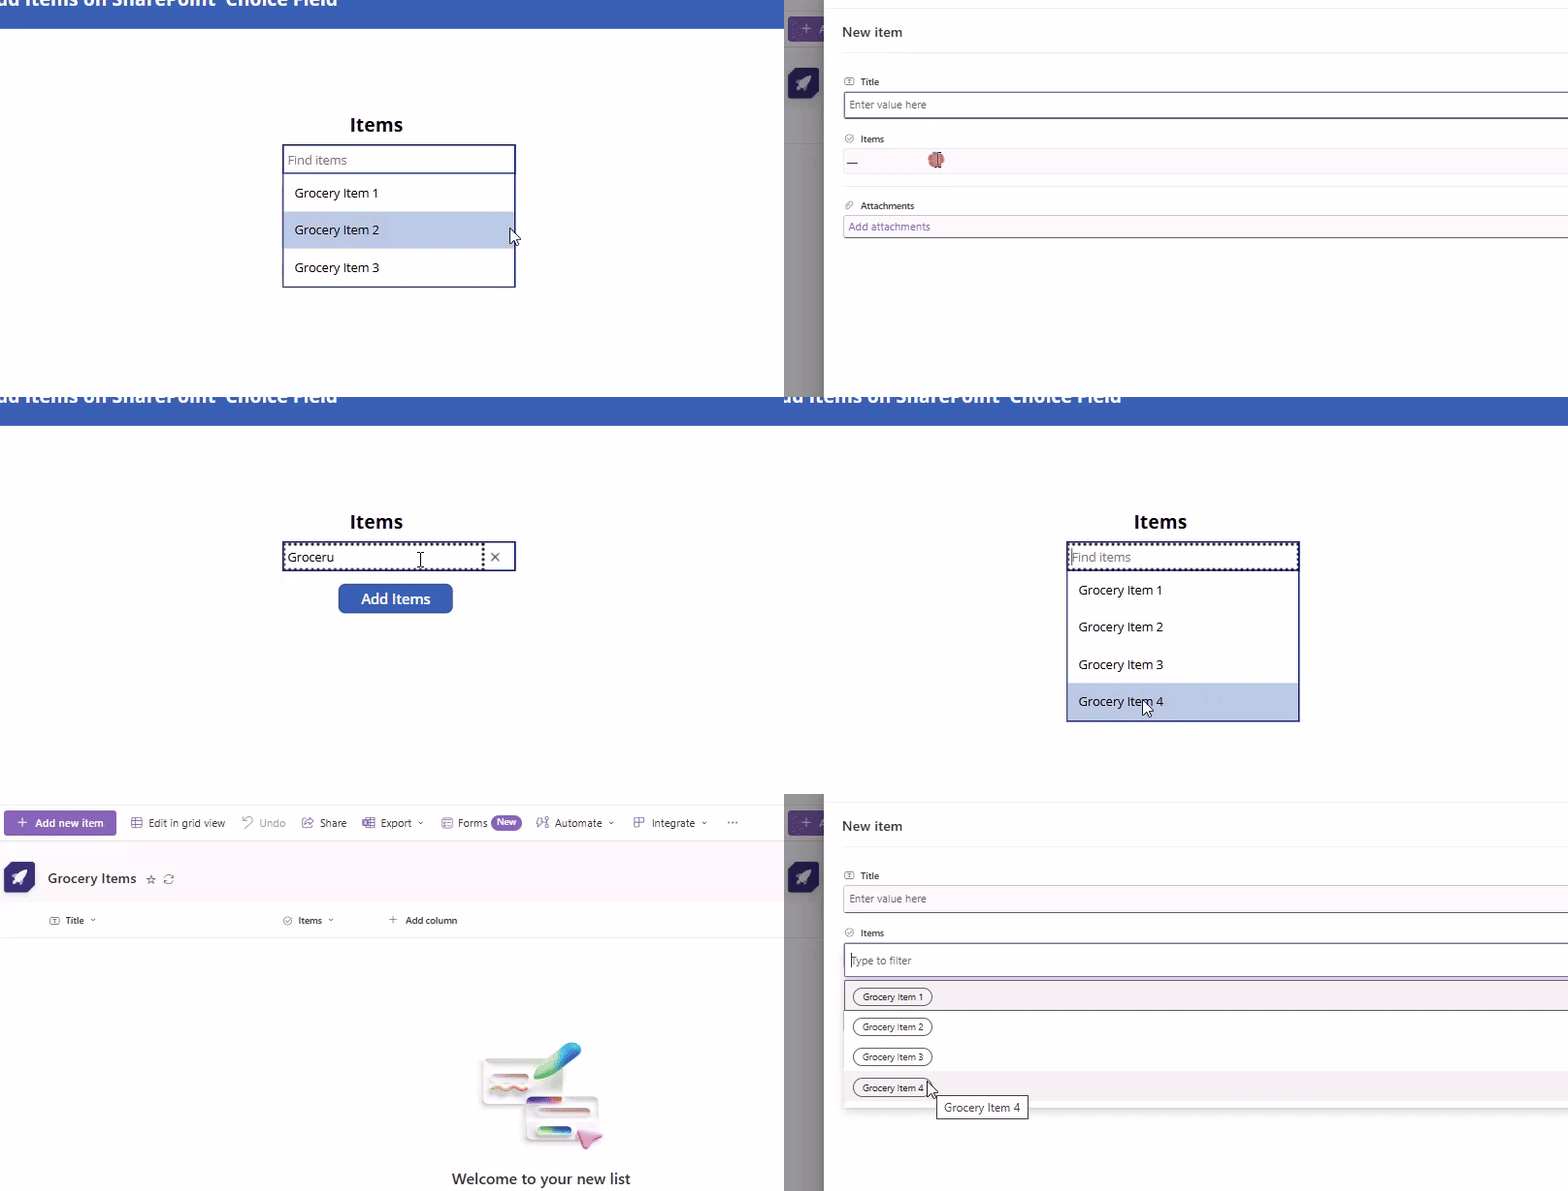
As a business entity, we want to minimize error modifying lists in choice fields directly on our database (SharePoint).
As a solution – we opt to add lists on our choice fields dynamically through canvas app with the help of power automate which does not require Power Platform premium license .
Step 1: Create a new list
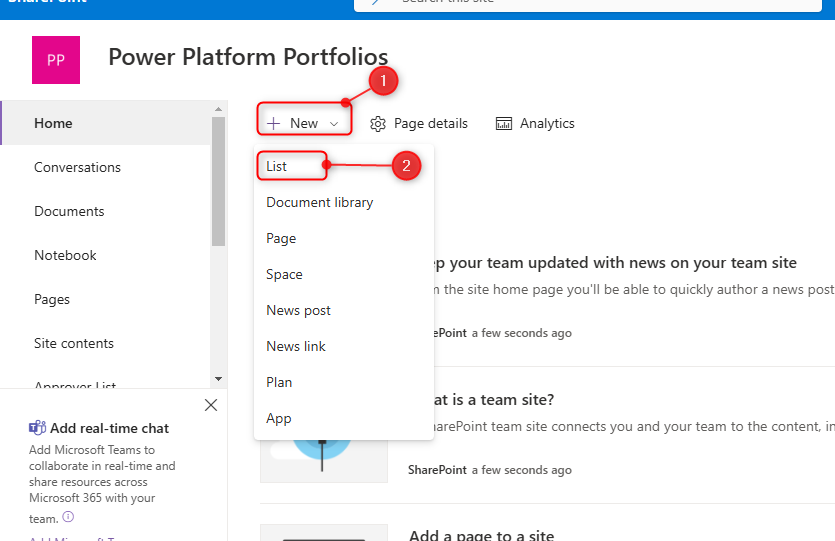
Step 1:
For this tutorial, we would be using a SharePoint site named Power Platform Portfolios.
Create a new list by following below steps:
- On the Power Platform Portfolios site, Click New.
- Choose List.
Step 2: Choose data for the list
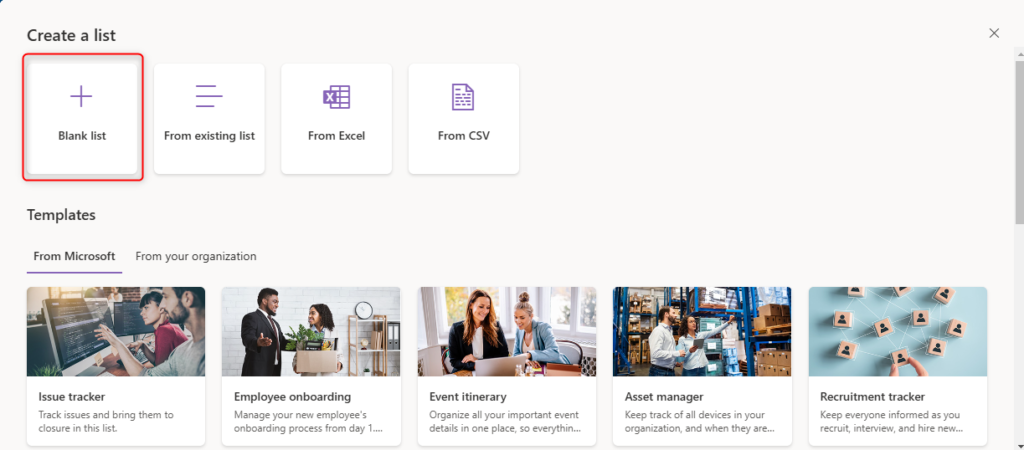
Step 2:
Select Blank list as our data for the list
Step 3: Give your list a name
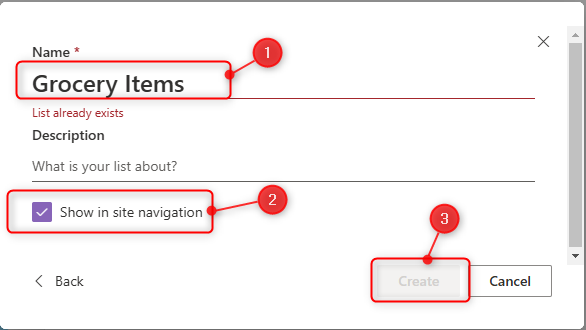
Step 3:
Give your list a name by following below steps:
- Name the list Grocery Items
- Check the Show in site navigation to easily create a shortcut to the list
- Select Create button.
Step 4: New choice field
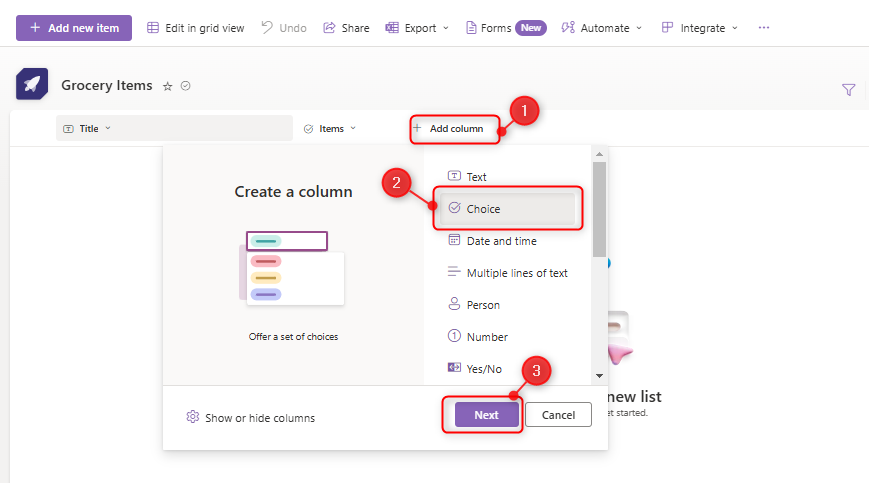
Step 4:
Add a new choice field by following below steps:
- Select Add columns
- Select Choice.
- Click Next button.
Step 5: Choice field property and contents
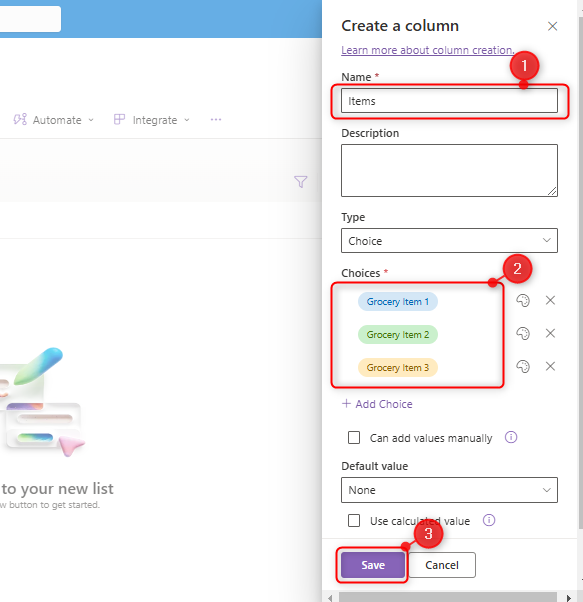
Step 5:
1. Set the choice field Name
Name
Items2. Type the Choices items.
Choices
Grocery Item 1Grocery Item 2Grocery Item 33. Click the Save button.
Step 6: Take Note of the Field Title and Field Internal Name
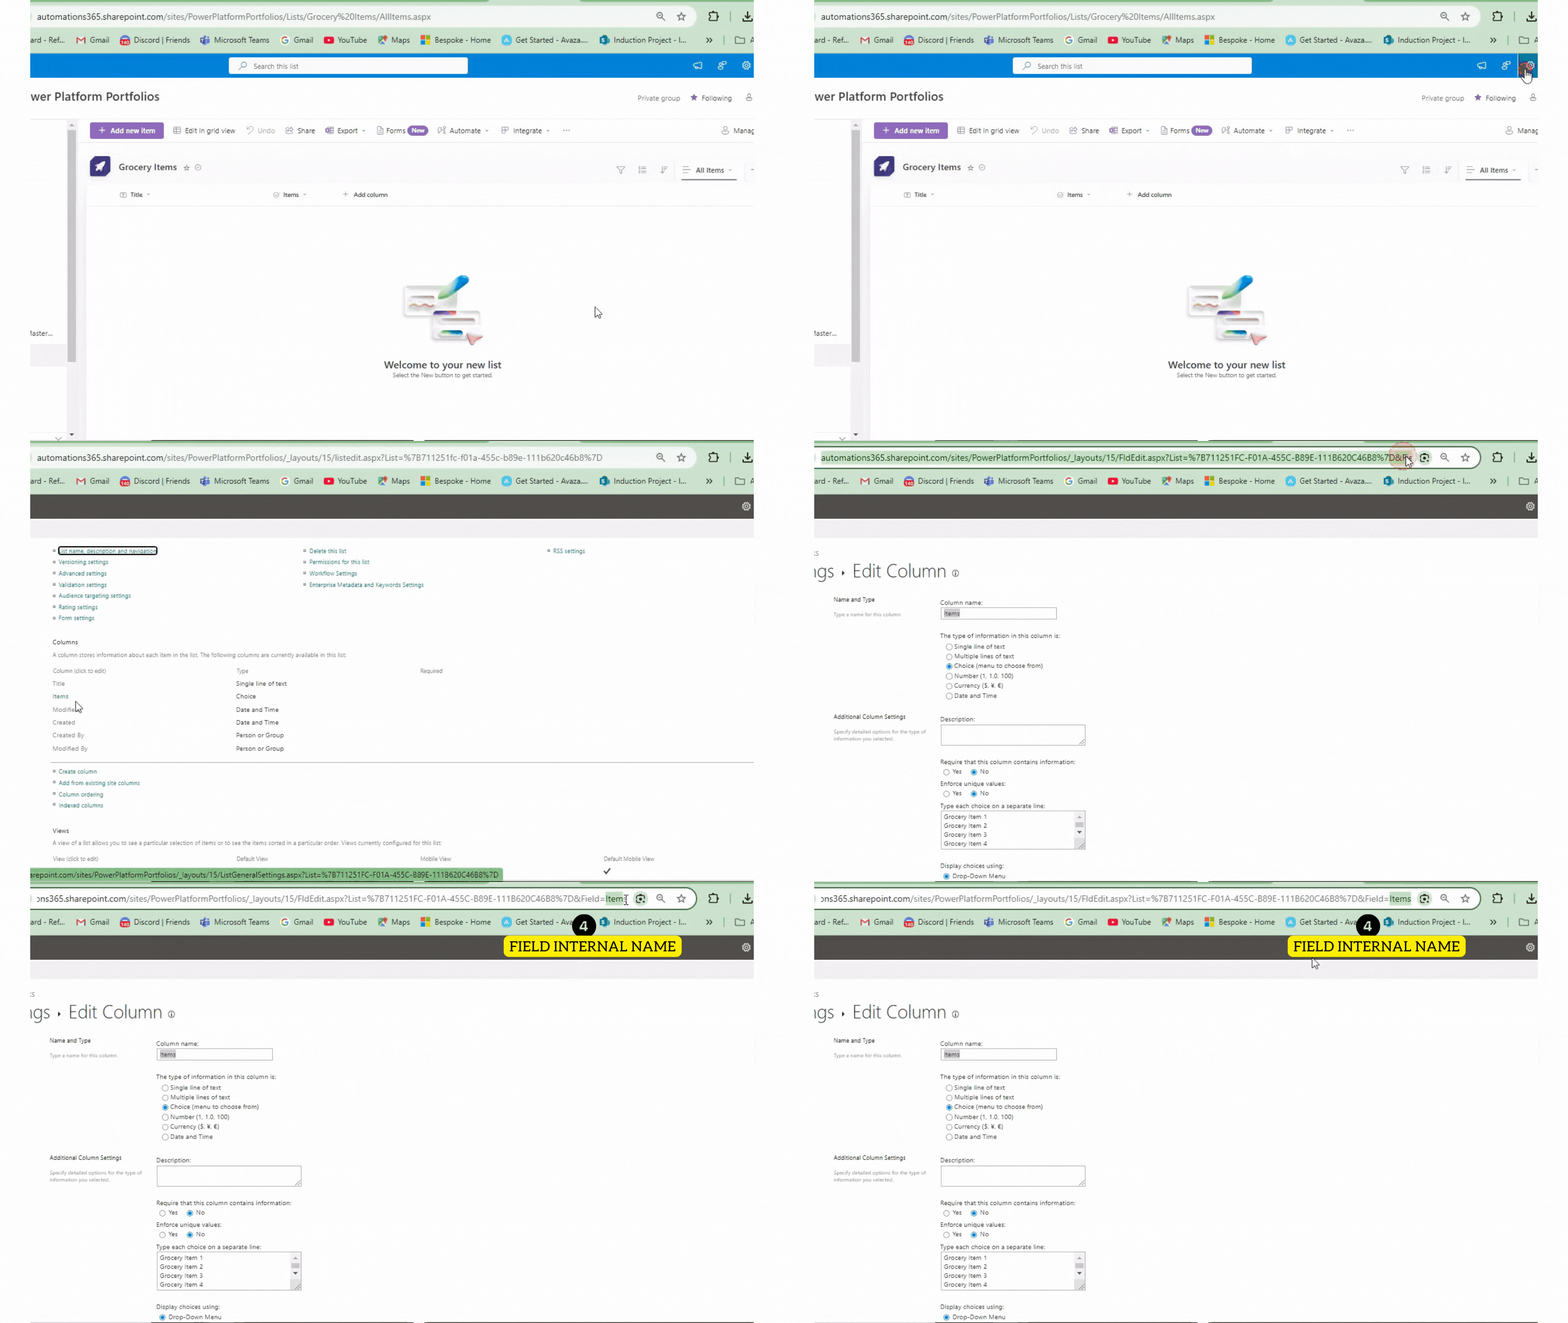
Step 6:
Take Note of the Field Title and Field Internal Name by following below steps:
- Take note of the Field Title Items which can be seen on the default view “All Items View”.
- Select the settings button, then choose List settings.
- Click the column field Items
- Take note of the Field Internal Name Items which can be seen on the field properties by selecting settings and the field name “Items“.
Field Title
ItemsField Internal name
ItemsStep 7: Add SharePoint Data
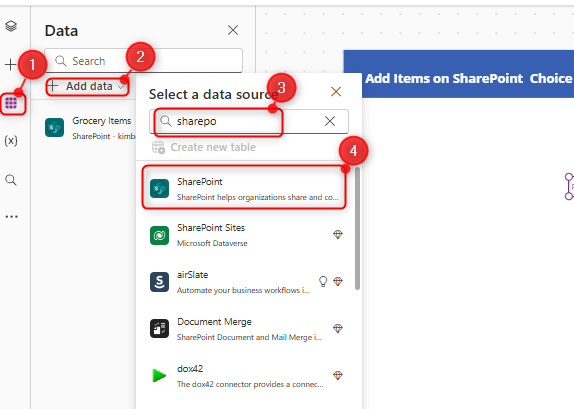
Step 7:
Create a blank canvas app from Power Apps. From the Power Apps studio, add SharePoint data by following below steps:
- Click Data.
- Click Add data.
- Search for SharePoint.
- Select SharePoint.
Step 8: Add the site created
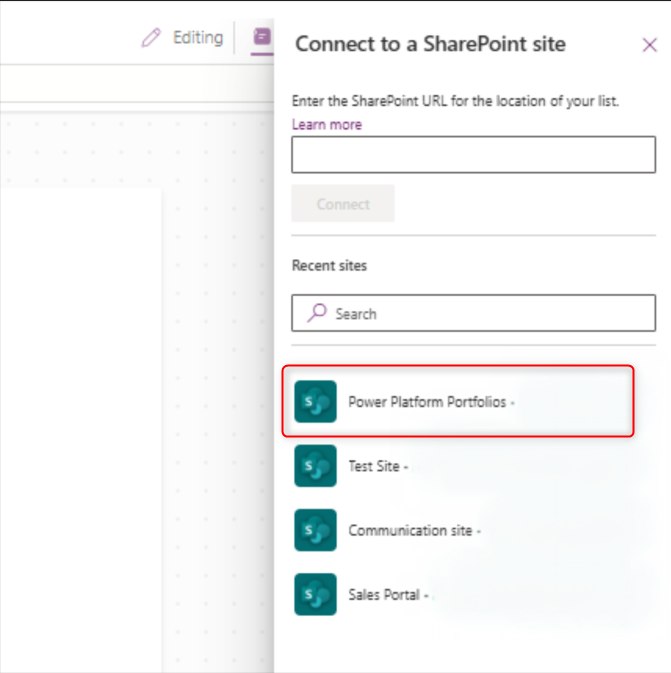
Step 8:
Below Recent Sites, select the site created.
Step 9: Add the new list as data source
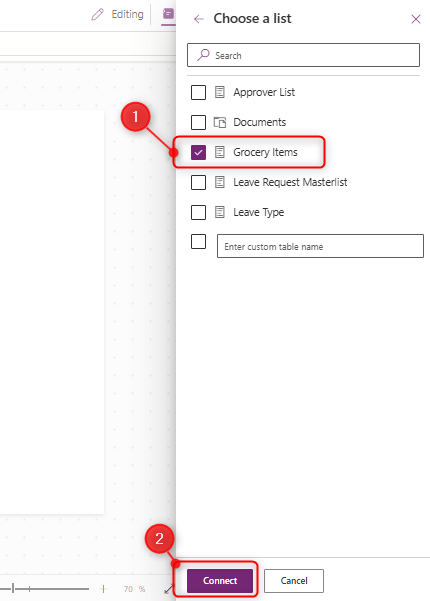
Step 9:
Add the new list as data source by following below steps:
- Choose the list created named “Grocery Items”
- Click Connect.
Note: The Grocery List items should now be connected.
Step 10: Items Label
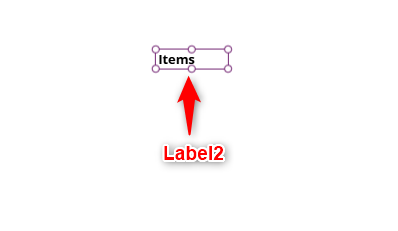
Step 10:
On the Canvas App, Insert a Label and name it Label2. Change the following properties:
Text
"Items"Size
20FontWeight
FontWeight.BoldStep 11: ComboBox
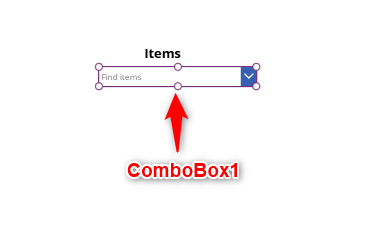
Step 11:
Insert a ComboBox and name it ComboBox1. Change the following properties:
Items
Sort(Choices([@'Grocery Items'].Items),Value,SortOrder.Ascending)DisplayFields
["Value"]SelectMultiple
falseReset
locresetNote: It will prompt an error due to locreset not being declared yet. We will add this code on the button after this step.
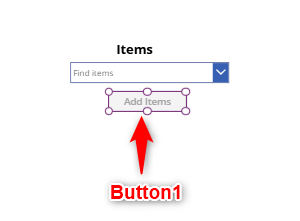
Step 12: Add Items button
Step 12:
Insert a Button and name it Button1. Change the following properties:
Text
"Add Items"OnSelect
//Add item to SharePoint Field Choice Column

AddChoice.Run(
    ComboBox1.SearchText,
    "[Field Title]","[Field Internal Name]","Grocery Items",
    "https://<yoursite>.sharepoint.com/sites/<sitename>");
    Notify("Choice has been added",NotificationType.Success);

//start timer to refresh
UpdateContext({locstarttimer:true,
            locaddeditem: ComboBox1.SearchText}
            );

//reset TextInput1
UpdateContext({locreset: true});
UpdateContext({locreset: false});
Note: Go back to Step 6 for the Field Title, Field Internal Name. Replace <yoursite> and <sitename> based on your SharePoint URL. It will prompt an error since we have not created the flow yet. Ignore the error and let us proceed on creating the flow on the next steps.
DisplayMode
If(
    Or(
    IsBlank(ComboBox1.SearchText),
    ComboBox1.SearchText = "",
    !IsBlank(
        LookUp(Choices([@'Grocery Items'].Items),
        Lower(ComboBox1.SearchText) = Lower(Value),Value))
    ),
        DisplayMode.Disabled,
        DisplayMode.Edit
    )
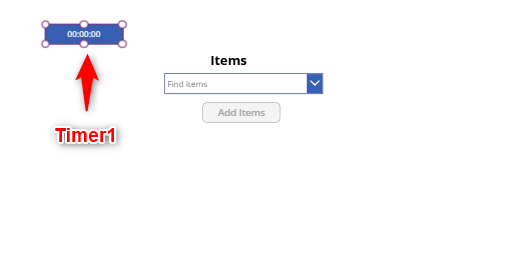
Step 13: Timer
Step 13:
Insert a Timer and name it Timer1. Timer will refresh the database until the new value is reflected on the app to avoid manual refresh. Apply the following properties:
Duration
3000OnTimerEnd
Refresh('Grocery Items');

If(
    !IsBlank(
        LookUp(Choices([@'Grocery Items'].Items),locaddeditem in Value)
            ),

        UpdateContext({locstarttimer:false,
                        locaddeditem: ""}
                        );
);
Repeat
trueStart
locstarttimerVisible
falseNote: This property will make the timer hidden
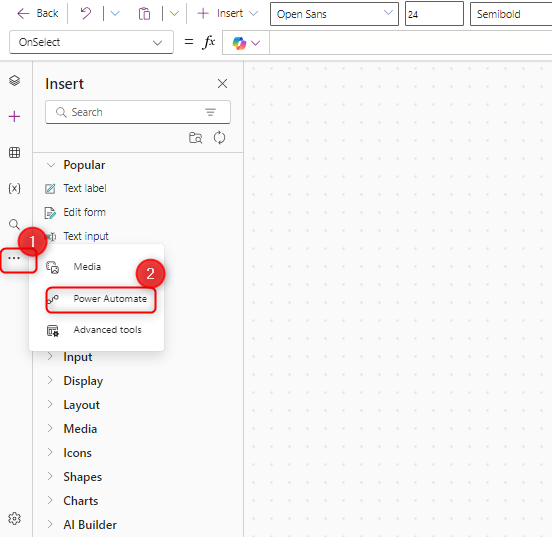
Step 14: Add Power Automate flow on Canvas App
Step 14:
Add Power Automate flow on Canvas App by doing the following:
- From the left side bar, click the ellipsis
- Choose Power Automate
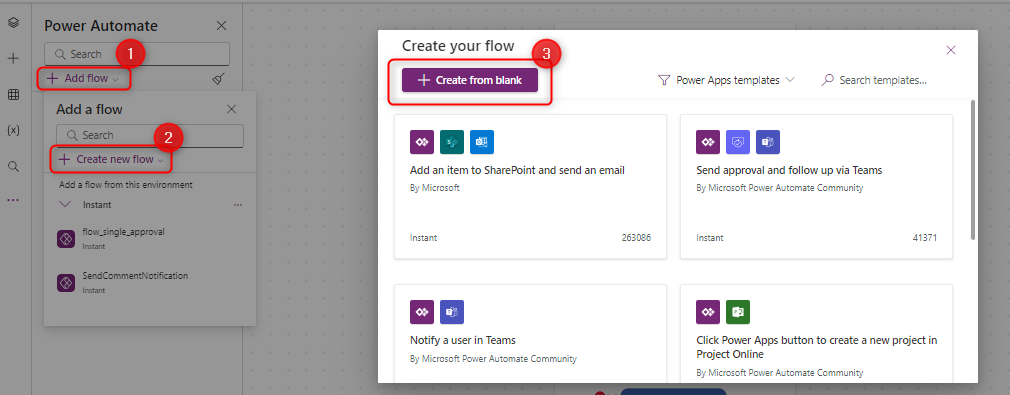
Step 15: Create a flow from blank
Step 15:
Create a flow from blank by doing the following:
- On the Power Automate section, select Add flow.
- Choose Create new flow. Create your flow dialog box will appear.
- Select Create from blank.
Step 16: Renaming the flow
Step 16:
Rename the flow to Add Choice
Step 17: Add User Input
Step 17:
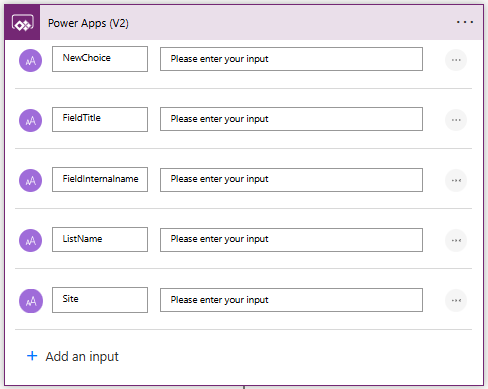
From the Power Apps (V2) Trigger, click Add an input, Choose Text and type the following name of inputs below:
User Inputs
NewChoiceFieldTitleFieldInternalnameListNameSiteStep 18: New Step [Initialize variable]
Step 18:
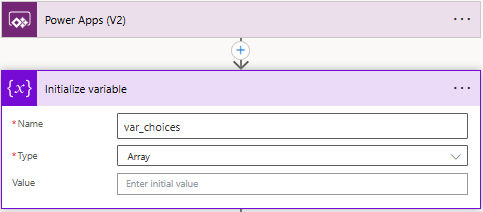
Click New Step, then search and choose Initialize variable.
Name
var_choicesType
ArrayStep 19: New Step [Send an HTTP request to SharePoint]
Step 19:
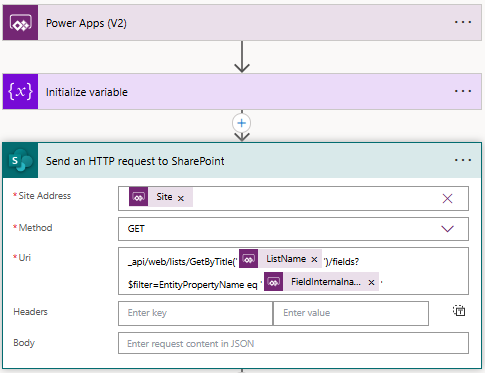
Click New Step, then search and choose Send an HTTP request to SharePoint. On the Site Address, select the dropdown and select Enter custom value.
Site Address

Method
GETUri
_api/web/lists/GetByTitle('@{triggerBody()['text_3']}')/
fields?$filter=EntityPropertyName eq '@{triggerBody()['text_2']}'
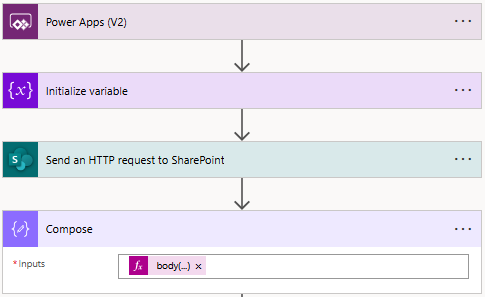
Step 20: New Step [Compose]
Step 20:
Click New Step, then search and choose Compose then paste below input to expression tab:
Inputs
body('Send_an_HTTP_request_to_SharePoint')?['d']?['results'][0]?['Choices']?['results']Step 21: New Step [Apply to each]
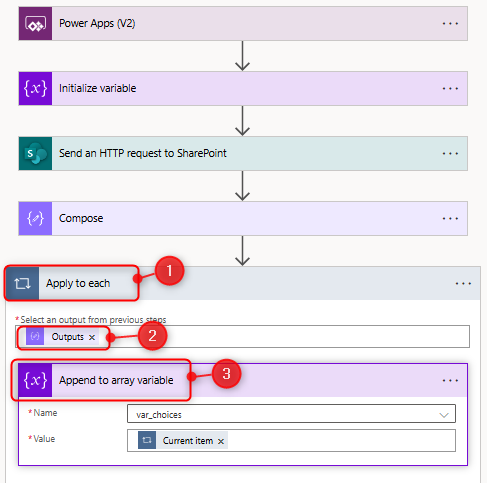
Step 21:
Apply the following steps on the New Step.
- Add an action Apply to each
- Add dynamic content Outputs from Compose action.
- Add an action Append to array variable and add apply below contents
Name
var_choicesValue
@{items('Apply_to_each')}Paste this code to Value input field
Step 22: New Step [Append to array variable 2]

Step 22:
Add an action Append to array variable outside the loop and apply below contents:
Name
var_choicesValue
@{triggerBody()['text']}Paste this code to Value input field
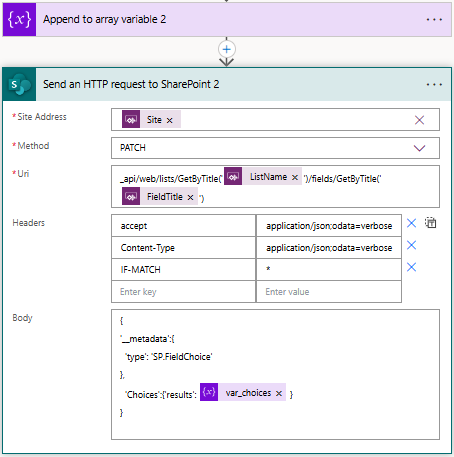
Step 23: New Step [Send an HTTP request to SharePoint 2]
Step 23:
Click New Step, then search and choose Send an HTTP request to SharePoint. On the Site Address, select the dropdown and select Enter custom value.
Site Address

Method
PATCHUri
_api/web/lists/GetByTitle('@{triggerBody()['text_3']}')/
fields/GetByTitle('@{triggerBody()['text_1']}')
Headers
acceptapplication/json;odata=verboseContent-Typeapplication/json;odata=verboseIF-MATCH*Body
{
'__metadata':{
  'type': 'SP.FieldChoice'
},
  'Choices':{'results': @{variables('var_choices')} }
}
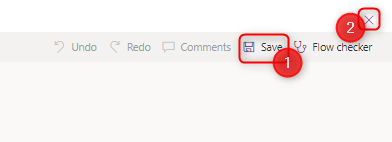
Step 24: Save and Test the flow
Step 24:
Do the following steps to complete the flow.
- Save the flow by clicking the save button.
- Close the flow. You will be directed to canvas app.
Conclusion

Test the flow by accessing the App and typing new item, then click the Add Items Button.
You can check if the item is already added both on the ComboBox1 and SharePoint field Items
Did this article help? Let us know how we can improve. Send us a message by clicking the “Contact Us” button below.
Article last updated on November 27, 2024
Need expert guidance on Power Apps?