Power Automate – Restrict SharePoint Item Access to Specific Users
8 steps
Overview
Restricting access to a specific SharePoint item is important if the list contains confidential data that only specific users should see.
You are able to hide SharePoint sites or lists from plain view. But even if it is hidden, it can still be accessed by other means. For instance, a user can create a Power App, or a Power Automate flow, and can connect to the SharePoint list with confidential data, thus seeing what should not be seen.
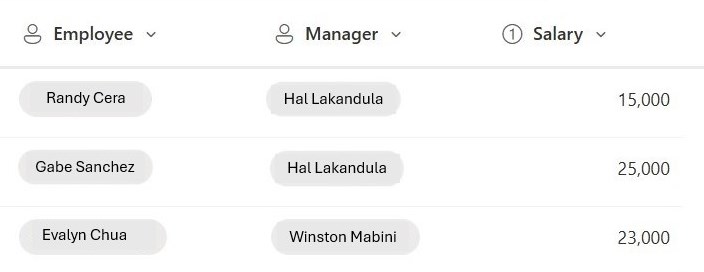
This tutorial will demonstrate a use-case where there is a list containing the salary info of each employees and only the appropriate employee and their manager will be the only ones who will see their own salary.
Our Set-up
![]() SharePoint list named Salary Info
SharePoint list named Salary Info
Note: The Employee and Manager columns are of Person type columns.
Step 1: Manual Trigger

Step 1:
Create an Instant cloud flow with manual trigger.
Step 2: Get Items
Step 2:
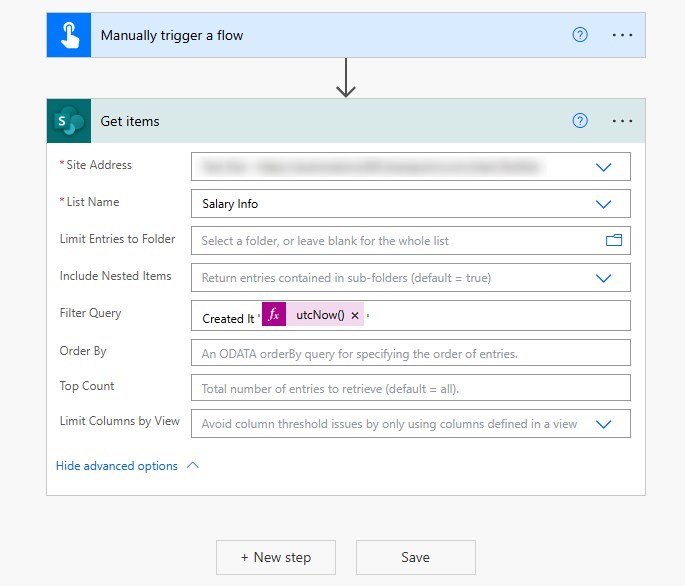
Add Get items (SharePoint)
Site Address
[Site where 'Salary Info' is located]List name
Salary InfoNote: Expand ‘Show Advanced options’
Filter Query


utcNow()Note: The filter query here does not really filter anything. It just removes the annoying warning pane whenever you test the flow.
Step 3: Stop sharing an item or a file
Step 3:
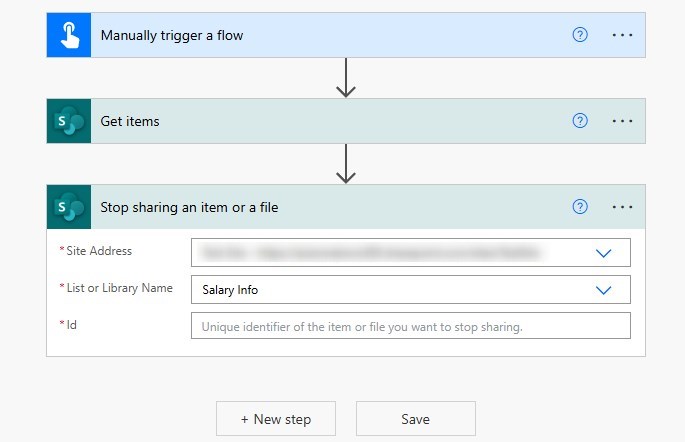
Add Stop sharing an item or a file (SharePoint)
Site Address
[Site where 'Salary Info' is located]List or Library Name
Salary InfoNote: Leave the Id field blank for now. This is for the next step
Step 4: Apply to Each
Step 4:
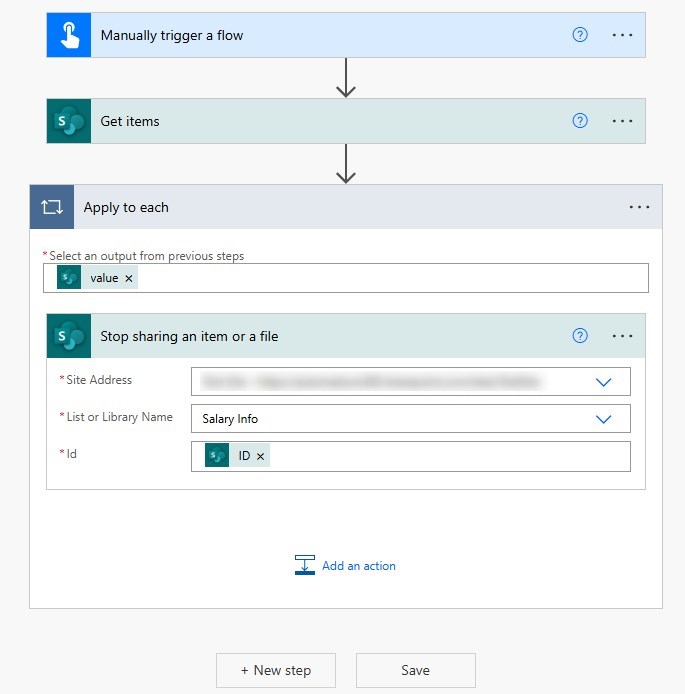
On the same action (Stop sharing an item or a file), fill out the Id using Dynamic content.
Id
Note: Once you selected the dynamic content of ‘ID’, an ‘Apply to each’ loop will automatically be applied.
Step 5: Grant access to an item or a folder
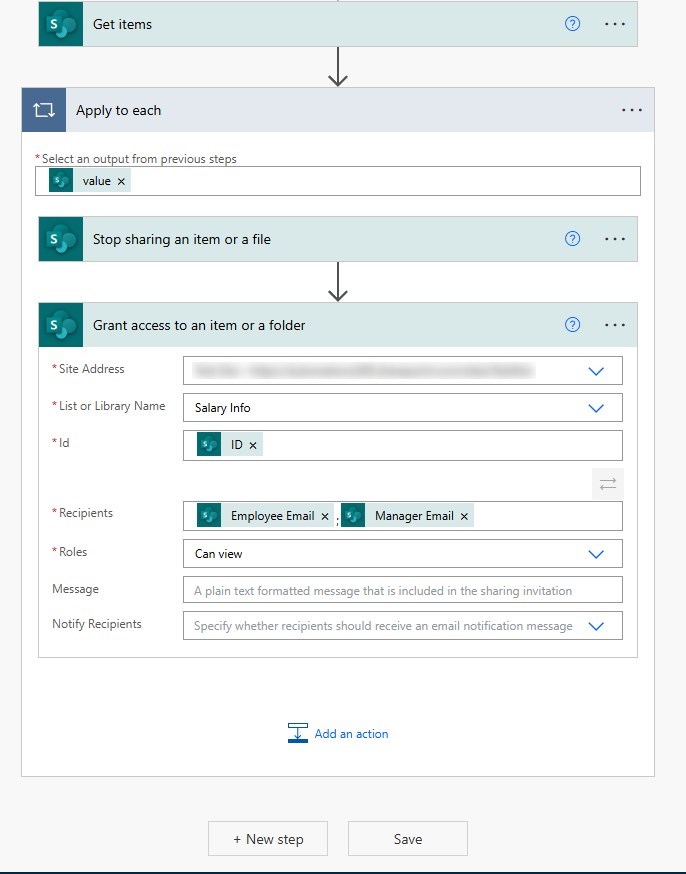
Step 5:
Add Grant access to an item or a folder (SharePoint) inside the Apply to each loop.
Site Address
[Site where 'Salary Info' is located]List or Library Name
Salary InfoId
Recipients
Note: Take note of the semi-colon (;) spearating the email addresses.
Roles
Can ViewNote: This action will grant read-only access to the assigned employee and his or her manager.
Step 6: Save and Test
Step 6:
Save and test the flow. Once the flow has successfully ran, proceed to the next step.
Step 7: Selecting SharePoint Item

Step 7:
To check if the access has been assigned properly, go to the SharePoint list ‘Salary Info‘. Do the following:
- Select an item by clicking the ellipsis (three dots).
- Click on ‘Manage access’
Step 8: Checking Access
Step 8:
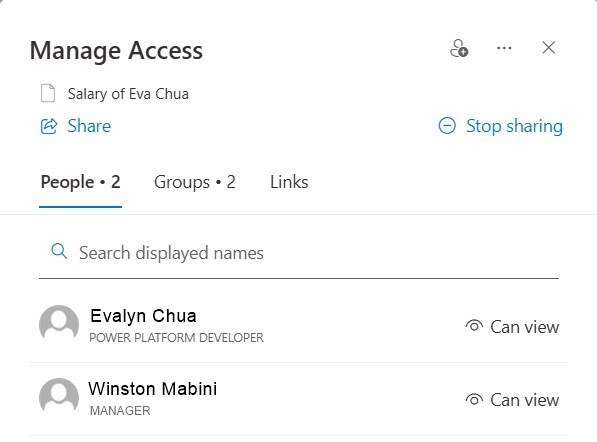
You should be able to see the two users that can access the item. Note that if the user is a SharePoint Owner, then that user will not appear in this list. Even if that owner is not in this list, he can still access all the items.
Conclusion

This demonstration shows you the concept of item-level security in SharePoint. To apply in your business app use-cases, the trigger would usually be “When an item is created” in SharePoint. Whenever a new row is added, it will have applied the security feature.
Did this article help? Let us know how we can improve. Send us a message by clicking the “Contact Us” button below.
Article last updated on February 26, 2025
Need expert guidance on Power Apps?